
A toilet that never stops running or never seems to flush well is more than a small annoyance. It is one of the most common and annoying water-related issues homeowners experience, and in many houses, the cause is simple. You may need to adjust a toilet float that sits too high or too low changes how the tank fills, since this can lead to wasted water, weak flushing, and steady dripping that can cause moisture problems over time.
The good news is that adjusting a toilet float is often safe, quick, and easy for most homeowners.
This guide explains how a toilet float works, why its setting matters, how to adjust it correctly, and how to tell when the problem points to something larger that a home inspector or plumber should check. It also includes insights based on what Bentley Home Inspection sees regularly in homes across Knoxville, Maryville, Louisville, Farragut, and nearby communities.
Why the Toilet Float Setting Matters
The float setting matters because it controls how much water fills the tank and when the refill cycle stops.
If the float is too high, the tank never signals the valve to shut off. If it is too low, the toilet will not flush with enough force. Most homeowners first notice this as a running toilet, higher water bills, or a flush that seems weaker than usual.
This is a common concern in our region because many older East Tennessee homes still use traditional ball-and-arm floats. These can slowly shift upward over time. Newer homes with cup-style floats can also slip out of place if the internal components loosen. During inspections, we often find that an incorrect float height explains most running toilets we observe.
The EPA reports that a single running toilet can waste up to 200 gallons per day, and the USGS notes that a slow leak can add 6,000 gallons or more per month if ignored.
For families in East Tennessee communities with rising water costs, that can turn into a surprise on the monthly bill. A quick float adjustment can stop the constant refill cycle and prevent that waste.
The Most Common Toilet Float Types You Will See
Before adjusting anything, it helps to understand what you are looking at inside the tank. Most toilets in our service areas fall into one of these two types.
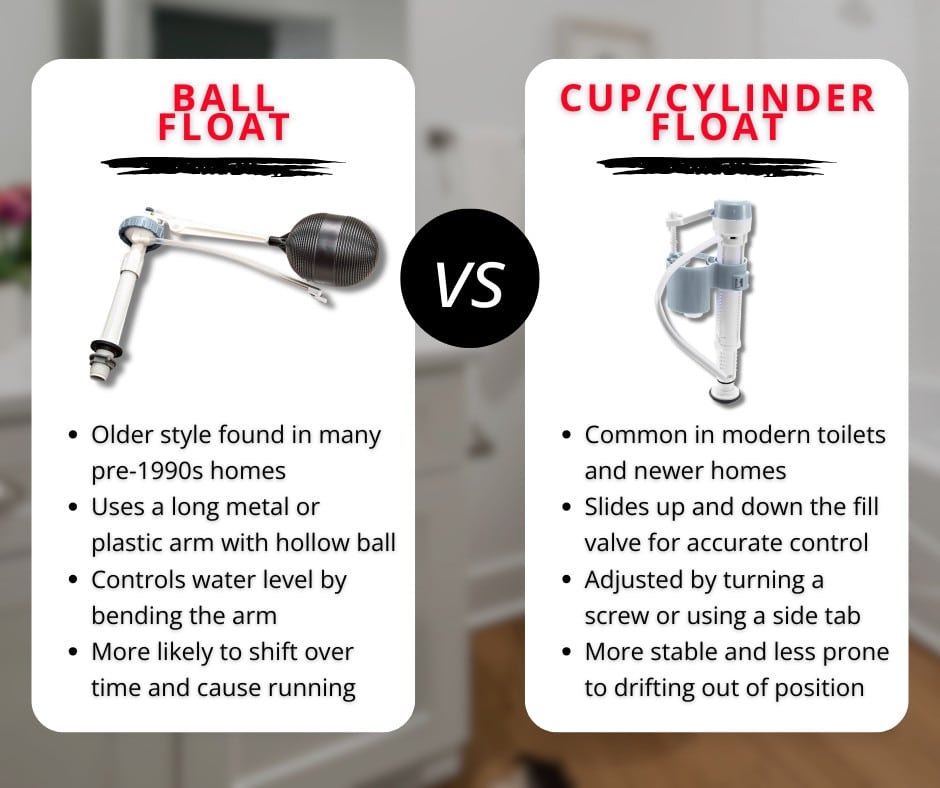
Ball Float (Arm Style)
This float has a long arm with a hollow plastic ball on the end. It rises as the water rises. It is very common in older homes across East Tennessee, especially those built before the 1990s.
Cup or Cylinder Float
This float slides up and down the fill valve. Most modern toilets use this style. Many newer builds in Knox County and the surrounding region have these compact systems.
There are pressure-assisted systems as well, but they are less common in residential homes. If the tank looks sealed or complex on the inside, adjustments should be left to a plumber.
Understanding which float is inside your toilet helps you choose the right adjustment method.
How to Adjust a Toilet Float the Right Way
The quickest way to adjust a toilet float is to raise or lower it until the water stops at the marked fill line inside the tank. Every toilet tank has this line, though it may be faint. The goal is to set the float so the water rises to that level and no higher.
Below is a complete step-by-step process that works for both common float types.
Start With a Safe Setup
Turn off the water supply behind the toilet by twisting the shutoff valve clockwise. This prevents movement while you work. Remove the tank lid carefully and set it on a towel so it does not crack. Tanks and lids are heavy and fragile, so slow, steady movement helps protect them.
At this point, you can see the float clearly. Confirm whether the tank has a ball float, a cup float, or something more complex.
Adjusting a Ball Float
For a ball float, the easiest way to change the water level is by adjusting the arm.
The answer is simple. Bend the float arm slightly up to raise the water level or slightly down to lower it.
Small changes make a big difference. A slight downward bend stops a running toilet in many homes we inspect. If the ball sits too high and keeps filling, lower it. If you are dealing with a weak flush, raise it a bit. After adjusting, turn the water back on and test a flush. If the tank fills to the line and stops, you are done.
Visual idea: A simple illustration showing the arm position before and after adjustment.
Adjusting a Cup or Cylinder Float
Cup floats usually have a small screw or side tab that raises or lowers the float.
The fast answer is to turn the screw to change the height or slide the float along its rod until the tank fills to the line.
Turn the adjustment screw clockwise to raise the float or counterclockwise to lower it. If your float has a pinch tab instead, squeeze the tab and slide the float upward or downward. These floats are extremely common in newer East Tennessee homes because they are reliable and easy to adjust.
Once set, turn the water back on and flush the toilet to test the tank’s fill level.
How to Know If Your Adjustment Worked
A successful adjustment is easy to confirm. Watch the tank fill after a full flush. The refill should stop right at the fill line inside the tank. The toilet should stop running within a few seconds of reaching that line. The flush should be sound, steady, and strong enough to clear the bowl completely.
If the tank continues running after your adjustment, if the float drops too soon, or if the water level rises above the fill line, the float may need a second adjustment. Small tweaks often solve the issue.
If the toilet still does not behave correctly after several adjustments, the problem may be deeper than the float. Homeowners sometimes mistake float issues for valve problems, leaks, or worn parts.
Signs the Float Wasn’t the Only Issue
During inspections, Bentley often sees cases where the float is not the root cause of the running toilet. These are the most common examples:
- A worn fill valve: The valve that controls the water flow can wear out. If it keeps refilling even when the float is set correctly, replacement may be needed.
- A damaged flapper: A flapper that does not seal the flush valve allows water to leak from the tank into the bowl. This constant loss of water makes the fill valve run.
- Sediment in the tank: Some East Tennessee areas have hard water, and buildup can affect components over time.
- Tank hardware loosened by age: Screws, seals, or mounting points may no longer hold steady.
If these issues appear, a professional may need to assess the tank or plumbing.
Toilet Float Issues and Your Home Inspection
Bentley Home Inspection checks plumbing fixtures during standard home inspections, and running toilets are among the most common findings. For buyers, sellers, and homeowners across East Tennessee, float problems often show up as small red flags that point toward bigger questions:
- Is there a hidden leak increasing water usage
- Is the plumbing system maintained well
- Is there moisture damage developing around the toilet
- Is the fill valve or shutoff valve showing signs of age
- Float adjustments are quick fixes, but a home inspection helps determine whether the condition is isolated or part of a broader plumbing concern.
Other Questions Homeowners Often Have
What other plumbing issues show up during inspections?
Common findings include small leaks, worn valves, slow drains, and aging water heater parts.
Can a running toilet hide other leaks in the home?
Yes. Higher water usage from a running toilet can mask small leaks in sinks, tubs, or supply lines.
How do inspectors check for moisture around bathroom fixtures?
They look for stains, soft flooring, loose tiles, and use moisture meters when needed.
What plumbing problems are common in older East Tennessee homes?
Older homes often have worn shutoff valves, outdated supply lines, and aging internal toilet parts.
When to Call a Professional
You should call a professional if the toilet continues to run after adjusting the float, if water leaks appear around the base, or if the tank hardware feels loose or damaged. A home inspector or licensed plumber can quickly identify whether the issue is with the fill valve, the internal seals, or the shutoff valve.
Bentley Home Inspection often advises homeowners to get help when:
• A running toilet has caused a noticeable spike in water usage
• The toilet is original to an older East Tennessee home
• The fix requires replacing hardware rather than adjusting it
• A pre-purchase or pre-listing inspection reveals multiple plumbing concerns
Professional guidance prevents moisture problems, hidden leaks, and wasted water.
Conclusion
A toilet float that sits too high or too low can cause running water, weak flushing, or higher water bills, but most issues can be corrected (and they’re simple to adjust). Understanding how the float works and how to set it helps homeowners fix the problem quickly and avoid long-term damage. For East Tennessee homeowners preparing to buy, sell, or maintain a home, keeping an eye on small conditions like this can help preserve plumbing performance and keep utility costs down.
If you believe the issue involves more than the float or if you want a full evaluation of your plumbing and fixtures, Bentley Home Inspection is here to help. Schedule your inspection today.
